Nuke at school
Nuke - What's different at school?
If you've used Nuke before you'll probably be familiar with the many ways it can be customized and the huge amount of gizmos and tools available online. Nuke at school comes with many of these customizations pre-configured for you.
Color management
Color management is globally configured for all our applications at school. You'll see this when you open your Nuke project settings and go to the Color tab:
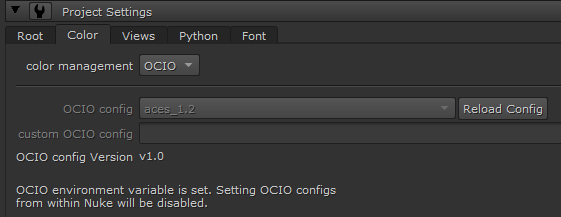
Don't change these settings! It's important they stay configured like this so Nuke plays nicely with the colors in our renders and the footage we get from our editors. Colorspace theory is taught in the second year.
Gizmos and tools
All our gizmos/tools can be found in the side bar when you click on the NFA logo. They'll also show up in your tab search.

As you can see we have quite a large selection available. Check out this page for an overview of tools made by our students!
It's not possible for you to install new gizmos yourself because of how our Nuke is customized from one central location. Gizmo/tool installation is typically done by more TD inclined students, as it involves a bit of Git version control. Instructions for this can be found in the TD section of this documentation. You can technically install plugins and gizmos in your own .nuke user folder, but keep in mind that your render will likely fail on the farm when you do this.
Two tools worth mentioning are Reduce Noise V5 by NeatVideo and MagicDefocus2 by Gilles Vink (an NFA alumni!).
Render farm
At school we have a render farm at our disposal which you can use to render your comps. Check out this page on how to submit your renders.
Nuke - Rendering on the farm
Submitting your comp to our render farm is quite easy. First you need to make sure that all the files used in your comp (and your Nuke file itself of course) are stored on our Storage server. After that just select the write node you want to render and click the "Submit to Deadline" button that's under the Render menu bar item (you can also press F5):
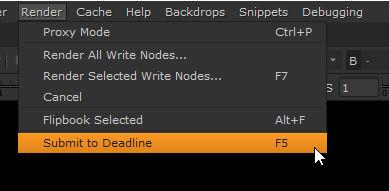
You will be greeted with the following menu:
A couple things to note:
- The priority option determines how many machines will be able to run your render. You should leave this at 70 unless you've agreed on a different number with your class' render managers.
- The options light, medium, heavy, and extreme determine how much a single PC on the farm should render at once. If you have a fast comp, one PC will be able to render 4 frames simultaneously without a problem. If you have a slow comp and use the extreme option, one PC will render 1 frame at a time. So, a light render is theoretically 4 times faster than an extreme render. However, you will cause PCs to hang and crash when you submit an especially slow comp using the light option, so try to judge which option suits your comp best.
- The smart frame spreading checkbox causes your frames on the farm to be rendered in a different order. First the first frame will be rendered, then the last frame, then the middle frame, after which the blanks will be filled in evenly. This is useful if you're submitting a comp that takes a long time to render and you want to quickly see if it's rendering successfully all the way through.
Deadline submission tools developed by Gilles Vink.
Nuke - Custom tools
Over the years our students have made a lot of nice additions to our Nuke. Here's a showcase of some of these tools.
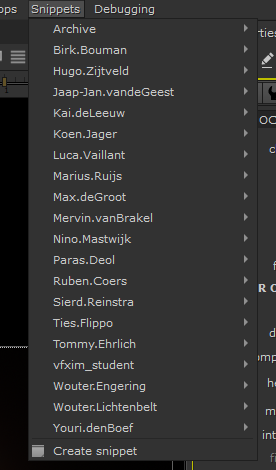
Snippets - By Gilles Vink
The snippets tool, which can be found in the top menu bar, makes it easy to store a part of your node graph so other Nuke users can load it into their comp. Just select the nodes you want to save, press "Create snippet" and give it a name. It will show up for other users under your own name.
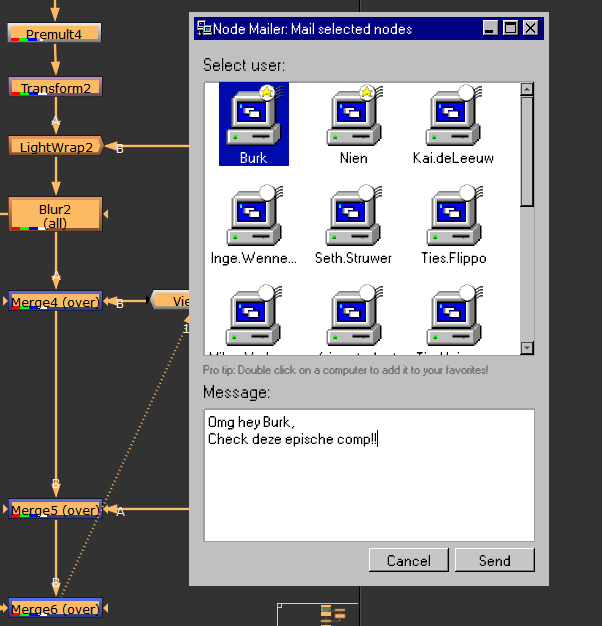
Node Mailer - By Mervin van Brakel
Node Mailer allows you to "mail" node setups to other students that have Nuke open at school. They will receive a pop-up notification that allows them to import the selected nodes you've sent.
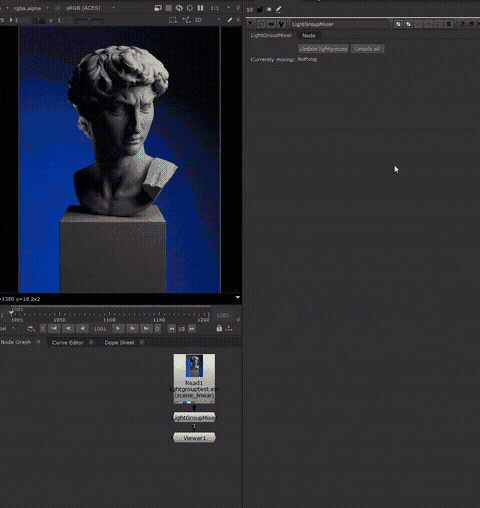
LightGroupMixer - By Mervin van Brakel
The LightGroupMixer gizmo goes through the layers of your CG render and collects light groups for you to grade. This only works if your light group layer names have the prefix LG_, which is done automatically in our ShotGrid pipeline.
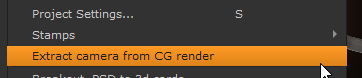
Extract Camera from CG render - By Max de Groot
Found in the Edit menu, this script uses the metadata stored in CG .EXRs to extract an animated camera. You can run it when you have a read node selected.
Breakout .PSD to 3d cards - By Mervin van Brakel
This tool was made specifically for concept artists who want to use Nuke to bring some 3d perspective to their 2d Photoshop layers. You can run it from the Edit menu when you have a read node selected which points to a Photoshop file. It will take your Photoshop layers and lay them out into the Nuke 3d scene.

PySide_Compat by Robbert Scholten
In 2026 we switched our supported Nuke versions from Nuke 15 to Nuke 16 & 17. One of the most impactful changes between those versions was Foundry's switch from PySide2 to PySide6.
PySide is a UI library used in a lot of Nuke plugins that are part of our pipeline. The switch from PySide2 to PySide6 came with some big changes; modules were renamed and restructured, some classes moved between modules, and a number of methods were renamed or removed entirely
Porting all our scripts to PySide6 by hand would have been lots of work, and would have left older Nuke versions broken.
Inspired by shims like Qt.py we came up with a different solution: pyside_compat.py
The result is that all our existing scripts stay almost entirely untouched. The only change needed is the import statement at the top of each file. Instead of importing PySide2 (or PySide6) directly, scripts now import from pyside_compat.
When pyside_compat is imported, it figures out which PySide is available in the user's Nuke version by trying to import PySide2 first, and falling back to PySide6:
On older Nuke versions (Nuke 15 and earlier), PySide2 works, so pyside_compat simply sends back the real PySide2 modules. Everything behaves exactly as it always did.
On newer Nuke versions (Nuke 16+), PySide2 isn't available, so it imports PySide6 instead, and applies some patches on top. These patches re-add the renamed/moved/removed APIs so that our PySide2-style code keeps working. Pyside_compat acts as a dictionary: our scripts are still written in PySide2, but compat makes sure PySide6 can read/understand them.
This way we can keep all our scripts unmodified across every Nuke version we support, instead of maintaining two PySide2 and PySide6 branches.
When adding new tools to our pipeline, please try to change any PySide import lines to pyside_compat. Especially for older PySide2 scripts, this makes sure everything will work across all our supported Nuke versions.
EXAMPLE:

# Before
from PySide2 import QtCore, QtGui, QtWidgets
from PySide2.QtCore import Qt

# After
from pyside_compat import QtCore, QtGui, QtWidgets, Qt
Additional custom tools
Tools under the BreakTools, MagicTools and MaximumFX tabs were also all made by students!
